
Details
Constant Voltage Micro-Controller Interface (this works great with the Arduino Micro-Controllers)
LED Power Repeater (Amplifier)
~~For 12V DC LED Strips or other 12v DC Devices like: relays, motors, lights, valves or anything that needs on/off or PWM Switching of 1-3 channels
~~Input: Screw terminals for easy connection.
~~Input Voltage: 2.0v - 5.5v (suggested) (+) is common and each of the 3 channels have separate (-) so you can use 1, 2 or all 3 of the channels
~~Output: Screw terminals for easy connection to our RGB flexible LED strips or control cable. (Common (+) Annode)
~~You can connect and control up to 4A/Ch of output (4x rolls of our RGB flex strip).
~~Supports PWM (Pulse-Width-Modulation) control 0-100% Dimming / Full Color Control
~~You can stack amps (2x repeaters connected = 8A/Ch) (4x repeaters connected = 16A/Ch)
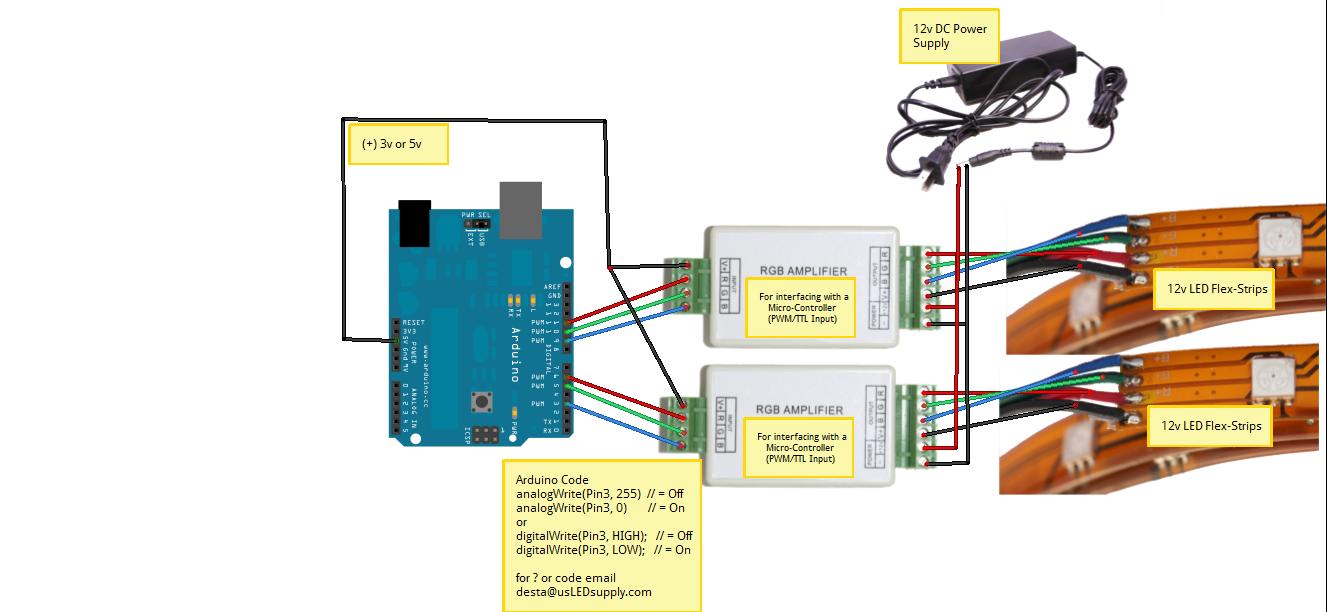
Simply connect 3x of your Micro-Controller PWM output pins to the RGB input of this amp then connect the (+) input to the +5v output on your Micro-Controller. Then, connect a 12v DC power supply to the (+) and (-) inputs on the amp and connect your RGB LED strips to the Output.
In your program you will want to write (ledPin, LOW); to turn on the device and (ledPin, HIGH); to turn it off
For Amplifier/Controller Sizing Chart Click Here
Additional Information
| Suggested Uses | For Controlling RGB or 1-3x single color flex strips with a Micro-Controller Great for an easy way to control your lights with custom software or via timers, motion detectors, home automation software, internet or iPhone
In your program you will want to write (ledPin, LOW); to turn on the device and (ledPin, HIGH); to turn it off
~~For 12V DC LED Strips or other 12v DC Devices like: relays, motors, lights, valves or anything that needs on/off or PWM Switching of 1-3 channels |
|---|---|
| Product Highlights |
follow the instructions in this picture then write to your output Pins to control the lights/devices Here are some code examples
// by Desta Courtney www.usLEDsupply.com
|
| Led Color | N/A |
| Mounting Options | Other |
| Voltage | 12v |
| Wattage | 4A/Ch |
| Output Power | 4A/Ch - 48W/Ch |
| Number Of Chanels | 3 |
| Rated Amps / Ch | 4A/Ch |
| Connections Input/Output | Simply connect the 3x PWM output pins of your Micro-Controller to the RGB input of this amp then connect the (+) input to the +5v output on your Micro-Controller. Then, connect a 12v DC power supply to the (+) and (-) inputs on the amp and connect your RGB LED strips to the Output. |
| Power Input: Connection Type, Voltage, Amperage | Screw Terminal 12v DC |
| Output Connection Type | Plug-able Screw Terminal |
| Can Power/Control (xx) Feet of strip | Can control 64' of our 12V RGB Flex Strip. |
| Controllable By | Micro-Controller's PWM Output |
| Dimmable Range / Steps | 0-100% via PWM |
| Suggested Accessories | Male Power Connector for connecting to our power supplies |
Check items to add to the cart or select all
-

24v RGB Flexible LED Strip 16' Roll (IP-65) (5060 30/M 150/Roll)
Regular Price:
Sale Price
-

12v RGB Flexible LED Strip 16' Roll (IP-65) (5060 30/M 150/Roll)
Regular Price:
Sale Price
-

Regular Price:
Sale Price

You have no items to compare.